Build a search engine for your courses
Easily find all of your handouts and other class materials with your reference management software

Image: Canva.com
Under normal circumstances, how do you typically deal with all of the notes, handouts, printed out articles, syllabi, and other documents that you get in your classes, either in paper format or digitally? Many students (and I was one of them!) will simply cram all of the papers into a notebook at the end of class. Some will then later on sort them into folders for each course. But it can be difficult to remember to do this when you're busy. Gradually your notebook will get fuller and heavier. The edges of the papers will stick out and sometimes even tear - in the exact spot you need to check later when studying for your exam.
Whenever you need to urgently check on something for your studies or if you want to read up on something for an assignment, you’ll end up frantically hunting through your notebook or folders until you finally find it. In many courses, there are also materials online, which means a third place where you have to look for information. This situation can be frustrating and cost you valuable time.
But is there a way to do it differently?
There is indeed - you could set up your own personal search engine. In other words, you can create a system in which your course materials are saved, sorted, and managed in such a way that you are able to find them easily when you need them again. And many of you will already even have software you can use for that: your reference management software. Reference management programs are a perfect fit since they’re designed for managing academic sources. So, adding your course handouts, readings, lecture notes, and presentation slides works similarly.
In this blog post, we’ll use Citavi to show you how you can set up your personal search engine and customize it to fit your needs. If you’re working with another reference management program, the steps will be similar, though. The guiding question when setting up your system should be how you will likely search for your documents later on. The ultimate goal is to create a system that will help you easily study for tests or write papers down the line. One nice side effect of putting in the effort is that you end up having to really think about your materials and their content, which helps you better remember that content later on.
Setting up your search engine
Scan and save your documents
First, you’ll want to have all of your papers in a digital format, so you’ll want to scan anything you don’t have an electronic copy of and save it as a PDF. Make sure that your scanning app uses automatic text recognition as this will be important later on. In this earlier blog post, we discuss how you can decide which documents are important enough to scan. To scan efficiently, don’t worry about naming your files and just make sure that you save them in a central place where you can easily find them later on.
After you’ve scanned your course handouts, you can import them into your reference management software. Usually you can add items by drag and drop or by using another import possibility to bring in multiple files at once. Citavi will automatically apply the reference type “Journal article” to PDFs, which can save you time if you’re adding articles. For other types of materials you won’t find a reference type that fits exactly, so you will need to change the reference type to one that is similar and offers all the necessary fields to properly describe the item. For example, for presentation slides, the reference type “Presentation” is best, while for course handouts, “Report or Gray Literature” will probably be the best fit. Next, fill in the fields with the key information for each source. The author will usually be the name of the professor who teaches your class. Keep in mind that you don’t need to fill out all of the fields. An example of how you might add lecture notes or a handout in Citavi can be found here.
If the PDF files you import contain metadata, it will be imported automatically. If you’re importing journal articles, the citation information will be added automatically as long as a DOI or other ID can be found somewhere in the article. If you are importing a scanned article or book chapter that your professor uploaded to a course platform, you may need to run optical character recognition (OCR) on it. As a side note, when scanning items yourself, keep in mind that books should almost never be scanned in their entirety due to copyright restrictions (usually only a chapter or 10% is allowed in the United States, for example). However, you can easily save the reference information for your textbooks by entering the ISBN.
If your professor has also recommended links to websites or if they’re saved on your course platform, add these to your reference manager, too. With a browser add-on like the Citavi Picker, you can do this in just a few clicks. Since webpages can change or be deleted entirely, it’s a good idea to also save a PDF copy of the webpage.
Classifying your documents
Using keywords or tags you can describe the content of your documents in your own words. This additional description is necessary since important terms won’t always appear in the text itself. For example, a text on China might not contain the word “Asia”. If a section of your paper will be dealing with the continent as a whole, you may want to add it as a keyword. In so doing, you’re making it easier for yourself to find the paper again in the future.
It’s fine to also use keywords that might seem strange at first. I was able to remember some texts by drawing on my spatial memory and recalling the color of the book in which an essay appeared. Certain texts were always red for me, since the book was red. If you’re a visual thinker, you might also want to tag your references with their color. Other people won’t be able to understand why a particular source has the keyword “blue”, but that doesn’t matter, since it’s your own personal search engine. Additional tips for using your keyword system to describe your contents can be found in this blog post.
Label and link documents
There will always be handouts or other materials that are more important than others and that you’ll want to revisit often. Designate these works in some way, for example, by giving them five stars or using labels, such as the red flag. In addition, you can write notes in the Evaluation field, for example “key work“.
Relationships between materials can also be documented, for example, if you have a PDF file explaining a theory and another document containing exercises on that theory. To show that these items belong together, you can create links.
Remembering content
Whenever you’ve just read a text, you’re sure that you’ll never forget its contents. Unfortunately, our memories are usually not as reliable as we would like them to be. After half a year and many other texts read in the meantime, the details will be hazy. For this reason, take notes while you read and transfer notes that you created during a lecture to your reference management software. If you’re using a reference management program other than Citavi, use the Notes field for short comments. If you’re using Citavi, a better choice is to create a Comment knowledge item for each individual note. The Summary knowledge item can be used when you want to create a summary for entire texts or sections. For more tips on how to structure and create summaries, see this earlier blog post. In addition to summaries and comments, there are a number of other knowledge items you can use to better divide up your notes. For example, if you want to paraphrase a point your professor made during class in your own words, create an indirect quotation in Citavi. Or, if you want to keep track of terminology, use the red highlighter to save terms as knowledge items.
Grouping
Another option for your search engine is to set up groups or folders. Groups aren’t hierarchical and can be used separately for references and knowledge items. You can create groups for each of your courses, for example:
- English 101
- Calculus 204
Or you can use a separate group for each semester:
- Winter semester 2020
- Sophomore year – second semester
Groups can also be used to document what you’ve done and want to do with your documents. For example:
- Read
- Important!
- Sources for final paper
- Handouts to study for final exam
Categorize
In addition to groups and keywords, the categories in Citavi offer a structured way to organize your handouts and notes. To keep your course materials from getting lost in sub-sub-sub-categories (just like with the folders on your PC) set a limit for yourself for the number of sub-categories in your category system. What works well is to treat your category system’s subcategories as the outline for a future paper. For example, you could create a top-level category “Term Paper – Sociology” and then create the sub-category “Methodology” underneath it. Under that you could add the sub-category “Critique”. Then, if a class presentation discusses the pros and cons of the methodology you wanted to use for your paper, you can assign the relevant information to this sub-category.
Using your search engine
After all that hard work, you’re going to want to put your search engine to use. Here are some of the ways you can work with it:
Prepare for a semester or comprehensive exam
The notes you created for your courses with the Comment and Summary knowledge items in Citavi can be found in the Knowledge Organizer. Display the group column (Alt + 6) and then select the group with the course name. Now, you just need to generate a compilation and you’ll have an organized list of your notes that can help you study.
If you used the Notes field instead of the knowledge items, print a project bibliography (just make sure to select the Notes field first).
View all materials from one professor
If you remember an important handout from a particular professor but don’t remember which class it was, you can use the filter to limit your search to just this one person. Just filter by the author of the document.
View key works for your subject area
If you assigned a specific evaluation to key works in your field of study, then just search in the Advanced search for a term such as “seminal work” in the “Evaluation” field. If you think you'll use this search again in the future, you might consider saving it as a filter.
If you evaluated your course materials with stars, sort your list of references by the number of stars so that the most important sources appear at the top.
Search for a specific term in a document
If you remember seeing the term “Food fraud” in an article, you can use the Quick search and the search prefix “ft:” to search for the term in all of the PDFs in your project.
Create complex search queries
If you vaguely remember a red book that had something to do with Asia and that you read during your first year of college, you can use the advanced search to find it again. Here’s an example of how you could combine your search criteria:
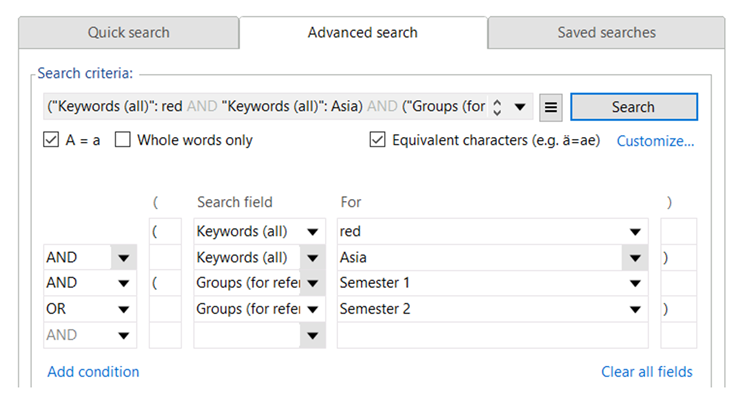
The search possibilities in reference management programs are quite powerful even when just searching the citation information automatically added by Citavi. So, if you want to save time, you can just rely on the search tools offered by your program instead of created your own search engine as described in this post. The automatically imported reference information for books and journal articles requires no effort on your part, and if you’re good at remembering what you read and where you read it, this minimal solution might suffice completely. The drawback is that your handouts, presentation slides, lecture notes and any other course materials that aren't books or journal articles won't be searchable.
Reference management programs also offer many additional features to organize and structure your course materials. However, you don’t need to use all of them – decide on the ones that will work for you and your workflow. If you don’t like stars or if a long list of keywords makes you feel overwhelmed, you don’t need to use those options. Instead, use categories and labels. No matter how you end up configuring your search engine: your future self will thank you come exam time.
Which feature in your reference management software ended up helping you the most when you later looked for information in a handout? Also, if you try this out for yourself, we’d love to hear which aspect of your personal search engine you’re particularly proud of or which has been the most helpful. Join the conversation on our Facebook page!